A Tin Canister by Bill McMillen, Part 3
- marcsitkin
- Apr 27, 2015
- 5 min read
Updated: May 12, 2023
Assembly of the cylindrical body This third blog installment profiling the construction of a tin canister by Bill McMillen will outline the assembly process of the body. Parts 1 and 2 published previously gave some background on the tin trade and the preparation of the component pieces that are cut from a 10" x 14" sheet of tinplate using patterns.
Recall that Bill has already cut the pieces for the round bottom and for the body of the canister. The first step in canister assembly is to transform the flat piece of tin for the body into a cylinder, with enough overlap of the ends to allow the joint to be soldered smoothly. This cylinder will be formed by hand around a wooden mandrel, but before that is done one of the short ends of the flat piece must be given a slight curve using a mallet and a metal stake (the short ends will be overlapped; the long ends will form the top and bottom circumferences of the cylinder). If you just formed the cylinder by hand without this step there might be insufficient curvature at the thin lap joint to make a tight seal. In this case Bill used a double seaming stake, but any stake with a cylindrical portion can be used. A tapered stake should not be used, as the curvature would be uneven.

Forming a curve to the end of the piece that will form the canister body
The cylinder is then formed around a wooden mandrel by hand. In this case, unlike the previous step on a stake, the mandrel is tapered, so Bill knows by experience on which part of the mandrel to work and how to work to achieve a cylinder. His hands "know the way."

Forming the cylindrical body by hand using a wooden mandrel
Gentle manipulation by hand at this point is necessary to bring one end of the cylinder around to come up to the line that was previously scribed onto the body to indicate the thickness of the overlap. This step is important, as the circular bottom piece was cut out to fit a cylinder of a specific diameter. Making the lap joint too thick would result in a cylinder that has too small a diameter, and making the joint too thin would result in a cylinder that has too large a diameter.
Once the cylinder shape is achieved with the proper overlap, small clamps can be used on each open end to secure the lap in its proper place prior to soldering. Used surgical hemostats work well and are often available at flea markets, although these would not have been available to 18th or 19th century tin workers.

Clamps (surgical hemostats in this case) are used to secure the seam prior to soldering
This canister has a simple soldered lap joint. Larger vessels, particularly those that would hold heavier liquids, frequently had locking "seamed" or even "double-seamed" joints, but they aren't necessary on a small vessel such as this.
Soldering the joint requires several items, including an appropriate soldering iron, solder, flux, and a solution of ammonium chloride (sal ammoniac.) In the 18th and 19th centuries the soldering irons would have been made with a sturdy tapered piece of copper attached to the end of a metal and wood handle, and they would have been heated in a small charcoal stove. The use of such soldering irons requires great skill in judging the temperature of the copper, as this temperature is critical to adhering the solder first to the copper, and afterwards to heating the joint to be soldered to the point where solder flows off the copper and into the joint where it hardens and seals. Bill is proficient at the use of these soldering coppers, but in the "privacy of his own home" frequently uses a modern electric powered soldering iron with a tip that maintains an appropriate temperature of 700 F.
Solder is a mixture of tin with another metal. Pre-20th century tin workers would have frequently used a 50/50 mixture of tin and lead. This solder is still available but, because of its lead content, should not be used on items that may contain consumable liquids or solids. Bill therefore uses a solder that is 96% tin and 40% silver which melts at 430 F and flows easily at the 700 F temperature of his soldering iron. The brand is Silvergleem, it is manufactured by Canfield Technologies and available through the internet. The 100 watt Weller soldering iron is also available with tips through the internet.
A flux is applied to the lap joint prior to the application of heat and solder. The flux removes impurities from the surfaces of the tinplate as it burns, and this allows the molten solder to spread evenly between the sheets and provide a tight seal as it cools. There are various types of solder available, but for this sort of work Bill uses powered rosin, grinding chunks (for stringed instrument bow use) in a mortar and pestle.
Sal ammoniac solution is used to clean impurities from the tip of the soldering iron. Powered sal ammoniac is added to a cup of water to form a concentrated solution. Once the soldering iron tip reaches the appropriate temperature it is dipped briefly into the solution, and/or wiped quickly on a moistened natural sponge, and then touched to the end of the spool of solder. As the solder comes in contact with the hot tip it melts and is pulled onto the hot tip in liquid form. While sal ammoniac was available in the 18th century, Bill isn't sure if it was used. At Colonial Williamsburg's armory, where they use 18th century techniques, the smiths use a coarse linen cloth with rosin, according to Bill.
A good source of soldering supplies is available online at Barnhart Studios.
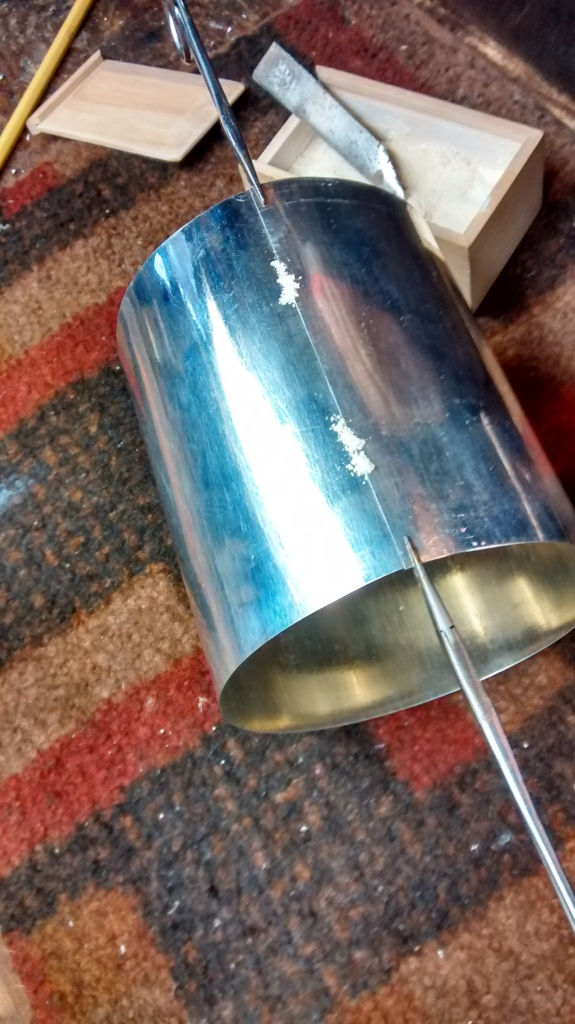
And now, to begin soldering the canister body: with the clamps in place at the ends of the cylinder, as shown in the photo above, two small patches of flux are applied along the seam.

Flux applied in two places prior to applying solder to tack seam in place
Now, solder is applied to these two spots using the heated soldering iron. After cooling for a few seconds, the clamps may be removed. The two tacked areas holds the cylinder in shape and it can then be slipped over a wooden mandrel so that the entire joint may be soldered. Powdered solder can be applied along the entire seam, or a solution of rosin in alcohol can be applied along the seam with a brush. Then, using a scratch awl to press the two layers together, the solder iron is used to apply solder along the entire seam. Moderate downward pressure is applied as the iron heats the metal to the point where solder flows off the tip and between the layers of tinplate. As this happens, Bill advances the iron slowly along the seam. Experience and judgment are needed to determine the rate at which the tip should advance. Too fast a rate results in insufficient heat transfer and flow of tin, with a weak non-waterproof joint. Too slow a rate causes the tinplate to overheat and become discolored.

My next installment will cover the construction of the canister bottom and its attachment to the cylindrical body. Stay tuned............... If you'd like to read other installments in this series you can read them here.


Comments